 Playbook基础入门
# Playbook基础入门
# 1. Playbook语法简介
Playbook采用YAML语法编写,参考YAML 入门教程 (opens new window)进行学习,这里不再赘述。
了解了普通的YAML格式文件,我们来看一下正式的Playbook内容是什么样的:
---
#这个是你选择的主机
- hosts: webservers
  #这个是变量
  vars:
    http_port: 80
    max_clients: 200
    #远端的执行权限
    remote_user: root
  tasks:
   - name: install Apache
     yum: name={{ item }} state=present
     with_items:
         - httpd
         - httpd-devel
    # 确认已安装apache
    - name: ensure that apache is installed
      yum:
        name: httpd
        state: present
    #利用yum模块来操作
    - name: ensure apache is at the latest version
      yum: pkg=httpd state=latest
    - name: write the apache config file
      template: src=/srv/httpd.j2 dest=/etc/httpd/conf/httpd.conf
      #触发重启服务器
      notify: restart apache
    - name: ensure apache is running
      service: name=httpd state=started
  #这里的restart apache 和上面的触发是配对的。这就是handlers的作用。相当于tag
  handlers:
    - name: restart apache
      service: name=httpd state=restarted
2
3
4
5
6
7
8
9
10
11
12
13
14
15
16
17
18
19
20
21
22
23
24
25
26
27
28
29
30
31
32
33
- 需要以“---”(3个减号)开始,且需顶行首写。
- 次行开始正常写Playbook的内容。可以指定此Playbook的用途。
- 缩进必须是统一的,不能将空格和Tab混用。
- 缩进的级别必须是一致的,同样的缩进代表同样的级别,程序判别配置的级别是通过缩进结合换行来实现的。
- YAML文件内容和Linux系统大小写判断方式保持一致,是区别大小写的,k/v的值均需大小写敏感。
key/value的值可同行写也可换行写。同行使用“:”分隔,换行写需要以“-”分隔。- 一个完整的代码块功能需最少元素包括
name和task。 - 一个name只能包括一个task。
- 在每一个play当中,都可以使用
with_items来定义变量,并通过****的形式来直接使用。
# 2. Playbook组件
# 2.1. handlers
使用handlers关键字,指明哪些任务可以被调用,与notify配套使用。
- 只有当
tasks中的任务真正执行以后(真正的进行实际操作,造成了实际的改变),handlers中被调用的任务才会执行,否则Playbook不会执行notify中指定的handlers关键字(包括条件判断)。 handlers中可以有多个任务,被tasks中不同的任务notify。- 一个
task可以同时调用多个handlers。 handlers可以调用handlers,直接在handlers中使用notify即可。
示例内容如下:
---
#这个是你选择的主机
- hosts: webservers
  #这个是变量
  vars:
    http_port: 80
    max_clients: 200
    #远端的执行权限
    remote_user: root
  tasks:
    - name: install Apache
      yum: name={{ item }} state=present
      with_items:
          - httpd
          - httpd-devel
    # 确认已安装apache
    - name: ensure that apache is installed
      yum:
        name: httpd
        state: present
    # 利用yum模块来操作
    - name: ensure apache is at the latest version
      yum: pkg=httpd state=latest
    # 替换配置文件
    - name: write the apache config file
      template: src=/srv/httpd.j2 dest=/etc/httpd/conf/httpd.conf
      # 触发重启服务器
      notify: restart apache
    - meta: flush_handlers
    - name: ensure apache is running
      service: name=httpd state=started

  handlers:
    - name: restart apache
      service: name=httpd state=restarted
2
3
4
5
6
7
8
9
10
11
12
13
14
15
16
17
18
19
20
21
22
23
24
25
26
27
28
29
30
31
32
33
34
35
执行结果:

handler执行的顺序与handler在playbook中定义的顺序是相同的,与handler被notify的顺序无关。如果需要执行完某些task以后立即执行对应的handler,则需要使用meta:
示例内容如下:
---
# 添加meta进行测试
- hosts: test
  tasks:
    - name: make test1
      file:
        path: /tmp/test1
        state: directory
      notify: testfile1
    # 立即执行之前的task所对应handler
    - meta: flush_handlers
    - name: make test2
      file:
        path: /tmp/test2
        state: directory
      notify: testfile2

  handlers:
    - name: testfile1
      file:
        path: /tmp/test1/testfile1
        state: touch
    - name: testfile2
      file:
        path: /tmp/test2/testfile2
        state: touch
2
3
4
5
6
7
8
9
10
11
12
13
14
15
16
17
18
19
20
21
22
23
24
25
26
执行结果:

# 2.2. 环境变量
# 2.2.1. 自定义环境变量
ansible中设置和使用环境变量的方法很多,通常可以通过用户家目录下的.bashrc、.bash_profile,或者是/etc目录下面的profile,以及profile.d文件夹来自定义环境变量。
通过.bash_profile来自定义环境变量,示例如下:
---
- hosts: test
  tasks:
    # lineinfile模块,功能有点类似sed,常用功能:对文件的行替换、插入、删除
    # 替换ENV_VAR为value,如果regexp未匹配到行的话,就是新增环境变量ENV_VAR
    - name: 为远程主机上的用户指定环境变量
      lineinfile:
        dest: ~/.bash_profile
        regexp: ^ENV_VAR=
        line: ENV_VAR=value
    - name: 获取刚刚指定的环境变量,并将其保存到自定义变量foo中
      shell: 'source ~/.bash_profile && echo $ENV_VAR'
      register: foo
    - name: 打印出环境变量
      debug: msg="The variable is {{ foo.stdout }}"
2
3
4
5
6
7
8
9
10
11
12
13
14
15
# 2.2.2. 预定义环境变量(未完成)
参考 配置环境 (在代理环境中) (opens new window)
对于某一个Playbook来说,我们可以使用environment选项来为其设置单独的环境变量。
示例:
---
- hosts: localhost
  vars:
    http_proxy: http://example-proxy:80/
    https_proxy: https:// example-proxy:443/
  tasks:
      - name: 使用指定的代理服务器下载文件
        get_url: url=http://www.example.com/file.tar.gz dest=~/Downloads/
          environment: var_proxy
2
3
4
5
6
7
8
9
# 2.3. 变量
Ansible中变量的命名规则与其他语言或系统中变量的命名规则非常相似。在ansible中,变量以英文大小写字母开头,中间可以包含下划线(_)和数字,应避免变量名中使用大小写字母混合的驼峰式写法。
# 2.3.1. Playbook变量
Ansible有多种不同的途径来定义变量。
通过命令行指定变量,如:
ansible-playbook example.yml --extra-vars "foo=bar"使用
vars代码块指定变量:--- - hosts: test vars: foo: bar tasks: # Prints "Variable 'foo' is set to bar". - debug: msg="Variable 'foo' is set to {{ foo }}"1
2
3
4
5
6
7使用
vars_files代码块来引用变量文件:--- - hosts: test vars_files: - vars.yml tasks: - debug: msg="Variable 'foo' is set to {{ foo }}" # vars.yml内容 --- foo: bar1
2
3
4
5
6
7
8
9
示例:通过指定ansible_os_family来在不同的操作系统上安装不同的包的效果:参考:A list with OS Family members (opens new window)
---
- hosts: example
  vars_files:
- [ "apache_{{ ansible_os_family }}.yml", "apache_default.yml" ]
  tasks:
      - service: name={{ apache }} state=running
# apache_RedHat.yml内容
---
apache: httpd
# apache_default.yml内容
---
apache: apache2
2
3
4
5
6
7
8
9
10
11
12
Ansible会主动读取远程主机的Facts信息,如果获取远程主机的ansible_os_family的值,那将会找到apache_RedHat.yml的变量执行,未找到文件则执行apache_default.yml的变量。
# 2.3.2. Inventory定义变量
在执行Ansible命令时,Ansible默认会从/etc/ansible/host_vars/和/etc/ansible/group_vars/两个目录下读取变量定义,如果没有这两个目录,可以直接手动创建,并且可以在这两个目录中创建与Hosts文件中主机名或组名同名的文件来定义变量。
我们还可以在group_vars和host_vars两个文件夹下定义all文件,来一次性地为所有的主机组和主机定义变量。
# 2.3.3. 注册变量
注册变量,其实就是将操作的结果,包括标准输出(stdout)和标准错误输出(stderr),保存到变量中,然后再根据这个变量的内容来决定下一步的操作。参考环境变量章节进行操作即可。
# 2.3.4. 高阶变量
普通变量
在Ansible命令行、Hosts文件,或者在Playbook和变量定义文件中定义的变量都 被称为简单变量或普通变量。
可以在Playbook中使用双大括号加变量名来读取变量内容,形如,如上文中提及到的使用vars代码块指定变量。
数组变量
由于Ansible是基于Python语言开发的,所以我们也可以称之为列表变量。如:
# Python语法格式
foo[0]
# Jinja2语法
foo|first
2
3
4
多级变量
多级变量类似于Python中字典概念,Ansible内置变量ansible_eth0就是这样一种变量,它用来保存远程主机上面eth0接口的信息,包括IP地址和子网掩码等。下面我们使用debug模块来展示一下变量ansible_eth0的内容。
---
- hosts: test
  tasks:
    - debug: var=ansible_eth0
2
3
4
执行结果:

当我们想要读取其IPv4地址时,可使用如下两种方法实现:
{{ ansible_eth0.ipv4.address }}
{{ ansible_eth0['ipv4']['address'] }}
2
# 2.3.5. 主机变量和组变量
- Inventory定义变量:前文已存在相关内容,这里不再赘述。
- group_vars和host_vars:前文已存在相关内容,这里不再赘述。
- ansible内置变量:Ansible提供了一些非常有用的内置变量,这里我们列举几个常用的:
| 变量 | 参数 |
|---|---|
| groups | 包含了所有Hosts文件里主机组的一个列表。 |
| group_names | 包含了当前主机所在的所有主机组名的一个列表。 |
| inventory_hostname | 通过Hosts文件定义主机的主机名(与ansible_home不一定相同)。 |
| inventory_hostname_short | 变量inventory_hostname的第1部分,比如inventory_hostname的值是books.ansible.com,那么inventory_hostname_short就是books。 |
| play_hosts | 将执行当前任务的所有主机。 |
| hostvars | 获取到其他主机中的信息。 |
# 2.3.6. Facts(收集系统信息)
Playbook中所指定的所有主机的系统信息,这些信息我们称之为Facts。在运行任何一个Playbook之前,Ansible默认会先抓取Facts。
Facts信息包括(但不仅限于)远程主机的CPU类型、IP地址、磁盘空间、操作系统信息以及网络接口信息等,这些信息对于Playbook的运行至关重要。我们可以根据这些信息来决定是否要继续运行下一步任务,或者将这些信息写入某个配置文件中。
使用setup模块来获取对应主机上面的所有可用的Facts信息:
ansible test -m setup
在Playbook任务中,如果不需要Facts信息,我们可以在Playbook中设置 gather_facts: no 来暂时让Ansible在执行Playbook任务之前跳过收集远程主机Facts信息这一步,这样可以为任务节省几秒钟的时间:
- hosts: test
  gather_facts: no
2
💡 如果远程主机上安装了Facter或Ohai,那么Ansible将会把这两个软件所生成的Facts信息也给收集回来,Facts变量名分别以facter_和ohai_开头进行标示。
# 2.3.7. 加密模块Vault
运行某些任务时,不可避免地会接触到一些密码或其他敏感数据,这些数据有可能是管理员密码、SSH私钥或远程主机的认证信息,Ansible自带的Vault加密功能,Vault可以将经过加密的密码和敏感数据同Playbook存储在一起。
假如使用API key的方式来访问一个服务的API,这个API key就存储在一个纯文本文件vars/api_key.yml中:
---
- hosts: appserver
  vars_files:
      - vars/api_key.yml
  tasks:
      - name: Connect to service with our API key.
          command: connect_to_service
          environment:
              SERVICE_API_KEY: "{{ myapp_service_api_key }}"
# vars/api_key.yml
---
myapp_service_api_key: “yJJvPqhqgxyPZMispRycaVMBmBWPqYDf3DFanPxAMAm4UZcw"
2
3
4
5
6
7
8
9
10
11
12
此时,我们可以使用ansible-vault进行加密:
ansible-vault encrypt api_key.yml
ansible-vault常用参数:
| 变量 | 参数 |
|---|---|
| encrypt | 加密文件。 |
| decrypt | 解密文件。 |
| edit | 用于编辑ansible-vault加密过的文件。 |
| rekey | 重新修改已被加密文件的密码。 |
| create | 创建一个新文件,并直接对其进行加密。 |
| view | 查看经过加密的文件。 |
# 2.3.8. 变量优先级
Ansible官方给出了如下由高到低的优先级排序:
- 在命令行中定义的变量(即用-e定义的变量)。
- 在Inventory中定义的连接变量(比如ansible_ssh_user)。
- 大多数的其他变量(命令行转换、play中的变量、included的变量、role中的变量等)。
- 在Inventory定义的其他变量。
- 由系统通过gather_facts方法发现的Facts。
- Role默认变量。
# 2.4. 流程控制
# 2.4.1. 条件判断-when
ansible中,条件判断的关键字是 when 。
# 如果ansible_distribution的值是CentOS,则打印System release is centos
- debug:
      msg: "System release is centos"
    when: ansible_distribution == "CentOS"
2
3
4
when关键字中引用变量时,变量名不需要加。- ansible使用
jinja2模板引擎,在ansible中也可以直接使用jinja2的这些运算符。如加、减、乘、除和比较(==表示相等,!=表示不相等,>=表示大于等于,等等)。逻辑运算符支持and(与)、or(或)、not(非),可以使用小括号来对逻辑运算符进行分组使用。 - 在少数
Jinja2并不能发挥强大功能的场景中,我们可以使用Python的内置方法来进行补充,比如:string.split和[number].is_signed()。
# 2.4.2. 条件判断-changed_when,failed_when
changed_when
当我们使用某些模块时,如果不使用changed_when语句,Ansible将永远返回changed。如果使用changed_when语句,并结合注册变量对任务返回结果进行判断后,再来决定是否显示状态为changed,将更加符合我们的实际需求。
---
- name: Test changed_when
  hosts: test
  remote_user: root
  tasks:
  - debug:
      msg: "ansible change test"
    changed_when: 0 > 1
2
3
4
5
6
7
8
failed_when
有一些命令会将自己的运行结果写入标准错误输出stderr中,而不是通常的标准输出stdout中,这时可以使用failed_when来对结果进行判断,从而告诉Ansible真正的运行结果到底是成功还是失败。
---
- hosts: test
  gather_facts: no
  remote_user: root
  tasks:
  - name: 通过CLI导入Jenkins任务
    shell: >
        java -jar /opt/jenkins-cli.jar -s http://localhost:8080/
        create-job "My Job" < /usr/local/my-job.xml
    register: import
    failed_when: "import.stderr and 'already exists' not in import.stderr"
2
3
4
5
6
7
8
9
10
11
# 2.4.3. 条件判断-ignore_errors
一些必须运行的命令或脚本会报一些错误,会直接导致Playbook运行中断。这时候,我们可以在相关任务中添加ignore_errors: true来屏蔽所有错误信息,Ansible也将视该任务运行成功。
---
- hosts: test
  gather_facts: no
  remote_user: root
  ignore_errors: true
  tasks:
  - command: "ls -alh /"
    register: ls
    changed_when: "'root' in ls"
2
3
4
5
6
7
8
9
# 2.4.4. Block块
在ansible中,可以使用block关键字将多个任务整合成一个块,这个块将被当做一个整体,我们可以对这个块添加判断条件,块功能可以将任务进行分组,并且可以在块级别上应用任务变量。
# 根据系统版本来区分apache包名称,路径,并安装apache
---
- hosts: web
  tasks:
      # Install and configure Apache on RedHat/CentOS hosts.
      - block:
          - yum: name=httpd state=present
          - template: src=httpd.conf.j2 dest=/etc/httpd/conf/httpd.conf
          - service: name=httpd state=started enabled=yes
      when: ansible_os_family == 'RedHat'
      sudo: yes

      # Install and configure Apache on Debian/Ubuntu hosts.
      - block:
          - apt: name=apache2 state=present
          - template: src=httpd.conf.j2 dest=/etc/apache2/apache2.conf
          - service: name=apache2 state=started enabled=yes
      when: ansible_os_family == 'Debian'
      sudo: yes
2
3
4
5
6
7
8
9
10
11
12
13
14
15
16
17
18
19
块功能也可以用来处理任务的异常。简单理解为try...catch...finally即可。
tasks:
    - block:
      - name: Shell script to connect the app to a monitoring service.
        script: monitoring-connect.sh
        rescue:
        - name: 只有脚本报错时才执行
          debug: msg="There was an error in the block."
        always:
        - name: 无论结果如何都执行
          debug: msg="This always executes."
2
3
4
5
6
7
8
9
10
当块中的任意任务出错时,rescue关键字对应的代码块就会被执行,而always关键字对应的代码块无论如何都会被执行。
# 2.5. 循环
# 2.5.1. with_items,with_flattened
with_items、 with_flattened关键字会把返回的列表信息自动处理,将每一条信息单独放在一个名为item的变量中,我们只要获取到名为item变量的变量值,即可循环的获取到列表中的每一条信息。
示例如下:
---
- hosts: test
  gather_facts: no
  remote_user: root
  tasks:
    - name: add several users
      user: name={{ item }} state=present groups=wheel
      with_items:
         - testuser1
         - testuser2
2
3
4
5
6
7
8
9
10
自定义列表中的每一个条目都是一个字典,可以通过item.key获取对应的值。
---
- hosts: test
  gather_facts: no
  remote_user: root
  tasks:
    - name: add several users
      user: name={{ item.name }} state=present groups={{ item.groups }}
      with_items:
        -
          name: 'testuser1'
          groups: 'wheel'
        -
          name: 'testuser2'
          groups: 'root'
2
3
4
5
6
7
8
9
10
11
12
13
14
# 2.5.2. with_list
with_items、 with_flattened关键字会把列表中的值按顺序进行执行,但是with_list关键字会把列表按照整体进行执行。
---
- hosts: test
  remote_user: root
  gather_facts: no
  tasks:
  - debug:
      msg: "{{item}}"
    with_items:
    - [ 1, 2, 3 ]
    - [ a, b ]
2
3
4
5
6
7
8
9
10
with_items打印:

with_list打印:

# 2.5.3. with_together
如果你想得到(a, 1)和(b, 2)之类的集合.可以使用with_together:
---
- hosts: test
  remote_user: root
  gather_facts: no
  tasks:
    - debug: msg="{{ item.0 }} and {{ item.1 }}"
      with_together:
        - [ 'a', 'b', 'c','d' ]
        - [ 1, 2, 3, 4 ]
2
3
4
5
6
7
8
9
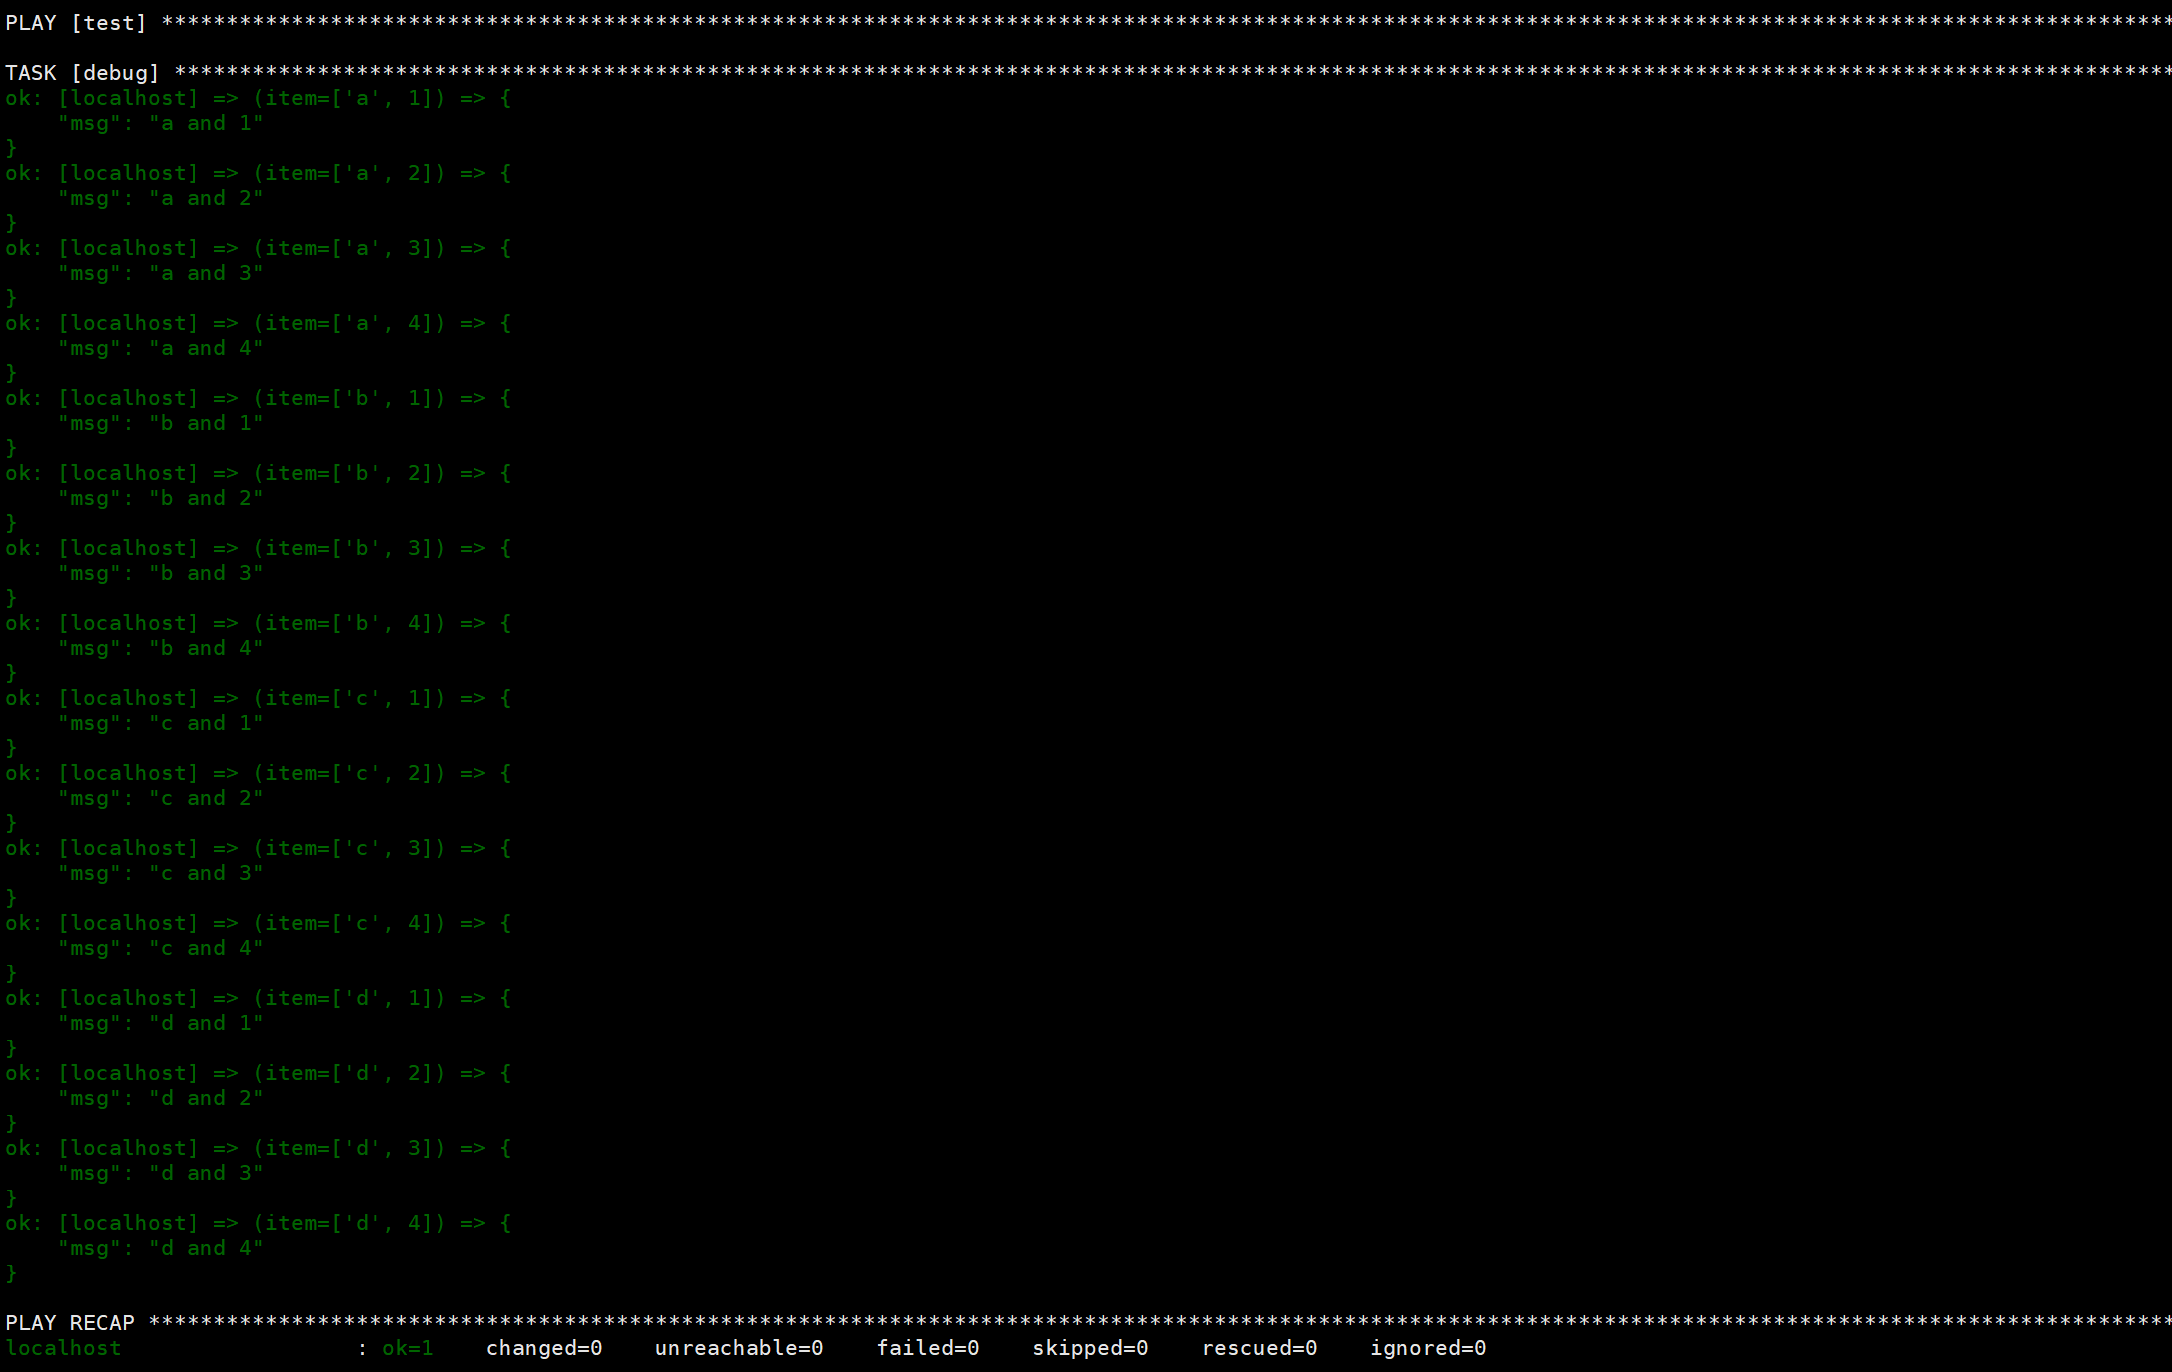
# 2.5.4. with_cartesian
with_cartesian关键字的作用就是将每个小列表中的元素按照笛卡尔积的方式组合。
---
- hosts: test
  remote_user: root
  gather_facts: no
  tasks:
    - debug: msg="{{ item.0 }} and {{ item.1 }}"
      with_cartesian:
        - [ 'a', 'b', 'c','d' ]
        - [ 1, 2, 3, 4 ]
2
3
4
5
6
7
8
9

# 2.5.5. with_sequence
with_sequence 关键字可以以数字顺序生成一组序列。你可以指定起始值(start)、终止值(end)、以及可选的步长值(stride),和数据格式化的功能(format)。
示例如下:
---
- hosts: test
  remote_user: root
  gather_facts: no
  tasks:
  - file:
      path: "/testdir/testdir/test{{ item }}"
      state: directory
    with_sequence:
      start=2
      end=10
      stride=2
2
3
4
5
6
7
8
9
10
11
12
# 2.5.6. with_dict
with_dict关键字可以处理字典变量,通过key关键字和value关键字分别获取到字典中键值对的键和值。
---
- hosts: test
  remote_user: root
  vars:
    users:
      alice:
        name: Alice Appleworth
        telephone: 123-456-7890
      bob:
        name: Bob Bananarama
        telephone: 987-654-3210
  gather_facts: no
  tasks:
    - name: Print phone records
      debug: msg="User {{ item.key }} is {{ item.value.name }} ({{ item.value.telephone }})"
      with_dict: "{{users}}"
2
3
4
5
6
7
8
9
10
11
12
13
14
15
16
# 2.5.7. with_subelements(未完成)
---
- hosts: test
  remote_user: root
  gather_facts: no
  vars:
    users:
      - name: alice
        authorized:
          - /tmp/alice/onekey.pub
          - /tmp/alice/twokey.pub
        mysql:
            password: mysql-password
            hosts:
              - "%"
              - "127.0.0.1"
              - "::1"
              - "localhost"
            privs:
              - "*.*:SELECT"
              - "DB1.*:ALL"
      - name: bob
        authorized:
          - /tmp/bob/id_rsa.pub
        mysql:
            password: other-mysql-password
            hosts:
              - "db1"
            privs:
              - "*.*:SELECT"
              - "DB2.*:ALL"
  tasks:
    - user: name={{ item.name }} state=present generate_ssh_key=yes
      with_items: "{{users}}"

    - authorized_key: "user={{ item.0.name }} key='{{ lookup('file', item.1) }}'"
      with_subelements:
         - users
         - authorized
2
3
4
5
6
7
8
9
10
11
12
13
14
15
16
17
18
19
20
21
22
23
24
25
26
27
28
29
30
31
32
33
34
35
36
37
38
# 2.5.8. with_file
with_file关键字获取到ansible主机中的文件内容。
---
- hosts: test
  remote_user: root
  gather_facts: no
  tasks:
    - debug:
        msg: "{{ item }}"
      with_file:
      - /tmp/1.txt
      - /tmp/2.txt
2
3
4
5
6
7
8
9
10
# 2.5.9. with_fileglob
with_fileglob关键字用来匹配文件名称。
---
- hosts: test
  remote_user: root
  gather_facts: no
  tasks:
    - debug:
        msg: "{{ item }}"
      with_fileglob:
      - /tmp/*
      - /tmp/*.???
2
3
4
5
6
7
8
9
10
# 2.6. 任务间流程控制
# 2.6.1. 任务委托
Ansible的任务委托功能可以在特定的主机上运行任务。delegate_to可以把某一个任务放在委托的机器上执行。
# Test delegate_to
---
- name: Test delegate_to
  hosts: test
  gather_facts: false
  tasks:
    - name: Test delegate_to
      ansible.builtin.debug:
        msg: "ansible delegate_to test"
      delegate_to: 127.0.0.1
2
3
4
5
6
7
8
9
10
# 2.6.2. 任务暂停
有些情况下,一些任务的运行需要等待一些状态的恢复,比如某一台主机或者应用刚刚重启,我们需要等待它上面的某个端口开启,此时我们就不得不将正在运行的任务暂停,直到其状态满足我们需求。
Ansible提供了wait_for模块以实现任务暂停的需求,wait_for模块常用参数:
| 变量 | 参数 |
|---|---|
| connect_timeout | 在下一个任务执行之前等待连接的超时时间 |
| delay | 等待一个端口或者文件或者连接到指定的状态时,默认超时时间为300秒,在这等待的300s的时间里,wait_for模块会一直轮询指定的对象是否到达指定的状态,delay即为多长时间轮询一次状态。 |
| host | wait_for模块等待的主机的地址,默认为127.0.0.1 |
| port | wait_for模块待待的主机的端口 |
| path | 文件路径,只有当这个文件存在时,下一任务才开始执行,即等待该文件创建完成 |
| state | 等待的状态,即等待的文件或端口或者连接状态达到指定的状态时,下一个任务开始执行。当等待的对象为端口时,状态有started,stoped,即端口已经监听或者端口已经关闭;当等待的对象为文件时,状态有present(存在)或者started,absent(不存在),即文件已创建或者删除;当等待的对象为一个连接时,状态有drained,即连接已建立。默认为started |
| timeout | wait_for的等待的超时时间,默认为300秒 |
示例如下:
- name: Wait for webserver to start.
  local_action:
      module: wait_for
      host: webserver1
      port: 80
      delay: 10
      timeout: 300
      state: started
2
3
4
5
6
7
8
# 2.7. 交互式提示
Ansible任务运行的过程中需要用户输入一些数据,vars_prompt关键字用来处理上述这种与用户交互的情况。
---
- hosts: test
  vars_prompt:
  - name: share_user
    prompt: "What is your network username?"
  - name: share_pass
    prompt: "What is your network password?"
    private: yes
2
3
4
5
6
7
8
vars_prompt几个常用的选项:
| 变量 | 参数 |
|---|---|
| private | 该值为yes,即用户所有的输入在命令中默认都是不可见的。 |
| default | 为变量设置默认值,以节省用户输入时间。 |
| confirm | 特别适合输入密码的情况,如果将值设为yes,则会要求用户输入两次,以增加输入的正确性。 |
# 2.8. Tags
Ansible的标签(Tags)功能可以给角色(Roles)、文件、单独的任务甚至整个Playbook打上标签,然后利用这些标签来指定要运行Playbook中的个别任务,或不执行指定的任务。
示例如下:
---
# 可以给整个Playbook的所有任务打一个标签
- hosts: test
  tags: deploy
  roles:
      # 给角色打的标签将会应用于角色下所有的任务
      - { role: tomcat, tags: ['tomcat', 'app'] }
  tasks:
          - name: Notify on completion.
            local_action:
               module: osx_say
               msg: "{{inventory_hostname}} is finished!"
               voice: Zarvox
            tags:
               - notifications
               - say
          - include: foo.yml
            tags: foo
2
3
4
5
6
7
8
9
10
11
12
13
14
15
16
17
18
